Troubleshooting for Icemaker Not Making Ice

When your refrigerator’s icemaker isn’t making ice, perform icemaker troubleshooting before calling repair. Chill out and try the following.

Icemaker Troubleshooting

1. Make sure the metal arm on your ice maker is DOWN and any control is set to “ON.”

Refrigerator Icemaker

2. Ensure the water supply is properly connected and turned on.

3. Tighten your drain cap. A loose drain cap leaves you with thin ice because water will empty from the water pan.

4. Examine the drain tube. The drain tube could be clogged from sediment. Flush out sediment by shutting off the water line, waiting and turning back on. Next, ensure there are no kinks in the drain that could prevent the flow of rejected water out.

Those are just basic tips everyone should try before calling for icemaker repair. Hopefully they works for you.

Featured image via KitchenAid

How To Choose a Range Style

Now that you’ve figured out where to buy a stove, use these quick tips on how to buy a stove.

The fastest way to narrow your options – beside knowing your existing fuel type, is to identify your style.

Freestanding Ranges

The freestanding range is the most commonly used range style in homes, probably because it’s the most affordable and easiest to install. Featuring finished sides and a flat back, this range sits flush against a back wall.

>>Shop freestanding electric ranges

>>Shop freestanding gas ranges

Built-in Ranges

fggs3065-LGWith the growing trend of decorative backsplashes, the slide-in range has become one of the fastest growing segments in the industry. Featuring unfinished sides and back, this style is designed to be built in between two cabinets.

The body of the range is typically 30 inches wide. The top of the range is slightly wider to prevent crumbs from getting in the crevices between the countertop and range. The oven and burner controls are located on the front of the range, just above the oven door.

range-di1Though similar to a slide-in range, the drop-in range has waned in popularity in recent years.

While a slide-in range touches the floor, a drop in range sits on top of a cabinet baseboard. Though a drop-in range looks more built in than a freestanding range or even a slide-in range, it’s also more difficult to replace because of its height and the limited selection of drop-in style ranges.

>>See built-in gas ranges

>>See built-in electric ranges

Professional (pro-style) Ranges

VDSC548-6GSS-lg
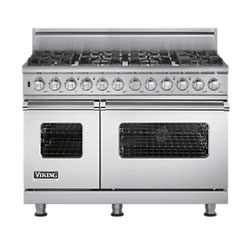
While it is the most expensive range style available in the industry today, the professional range is gaining steam in gourmet kitchens. Pro-style ranges take the performance and styling of a true commercial range and make it safe to use for a home cook.

The oven and burner controls are always located on the front, just above the door.  Professional ranges feature burners capable of reaching high temperature for rapid boiling as well as extremely low temperatures for delicate and precise simmering. Larger models (36”, 48” or 60” wide) offer flexibility in the cooking surface, allowing for the addition of built-in griddles, grills and other specialty surfaces. Large ovens generally boast convection capabilities and intensely high-temperature broiling.

Professional ranges generally come in a stainless steel finish. However, some manufacturers such as Viking and Dacor offer distinctive colors (i.e. beyond white and black).

>> Read more advice on buying a range in our Range Buying Guide.

>>See all our Appliance Buying Guides

Well-versed In Customer Appreciation

SmileyFace_xlarge

Artist’s rendering of customer

Yesterday, we received pretty much the sweetest letter from a customer in recent memory.

Not only did it remind us how great our customer service department is, it rhymed (well, mostly).

We’re so very appreciative of our customers that we’re delighted whenever the sentiment is returned.

We’re publishing the poem with you here, because it’s too cute to be shared with only an envelope:

I arose this morning
Happy as can be
Went into my kitchen
And what did I see?

Water all over
My nice clean floor
I opened my refrigerator
And couldn’t believe what I saw

A small lake in the bottom
Some frozen, some melted
I dashed for the phone
I really needed help

Tomorrow, they said,
My fridge would be fixed
I said OK
My popsicles melted off their sticks

I called back again
And with Lauren in St. Paul I pleaded,
Oh somehow can my fridge get fixed today?
And by gosh she conceded and they were on their way.

An hour or so later
Mike & Bill did arrive
When the truck pulled up
I was so happy I almost cried

What a great team
They saw the problem right away
Out came the tools
And eventually, the ice melted away

What a great company
to do business with
Which I have for many years
Give a toast to your employees, use champagne not beer

I wanted you to know
What great people work for you
Anytime stop by for a cold one
The bottles are cold thanks to your crew

Regards, Mike

Seriously, customers. Any time you offer creative appreciation AND beer, you have our attention 🙂

How To Check Your Dryer for Lint Buildup

If your dryer’s not drying, troubleshoot your vent before calling for dryer service. Especially if you’re running your dryer twice to get clothes dry.

If your dryer’s vent system is clogged, moist air won’t exhaust as well and it will take longer for your clothes to dry.

Is There Dryer Lint Buildup?

Follow these steps to check for dryer lint buildup.

  1. Run your dryer for at least 5 minutes
  2. Find your exhaust hood on the exterior of your home. It will look like one of these

angledhood

boxedhood2
dryervent-9
Use your hand to feel for air movement. If it’s less than a hair dryer on high speed, clean the lint from the entire length of the system and exhaust hood. This should be done about every two years anyway.

Ready for a new dryer? Shop here.

Dishwasher troubleshooting: Dishwasher drying tips

If your dishes come out of the dishwasher looking like this...

If your dishwasher isn’t drying, just know that your dishwasher drying problems might be completely fixable.

The No. 1 cause of wet dishes is lack of rinse aid, or drying aid as I like to call it.

Most think of rinse aid’s aesthetic benefits, because it helps water “sheet” off dishes rather than forming water droplets that cling and leave icky  spots.

But modern dishwashers are designed to use rinse aid for drying, so without it, your dishes and dishwasher interior will have excessive moisture. Also, the heated dry option will not perform as well without rinse aid.  (Now is a good time to check if your dishwasher includes a Heated Dry – or Extra Dry – option you might not be using.)

Once you fill your rinse aid dispenser, don’t forget to refill it. A full dispenser will last about a month, but I top mine off every couple weeks.

Proper loading also ensures good drying performance. Load items, especially plastic, at an angle so water can sheet off. Plastics have a porous surface and tend to collect droplets, so they take longer to dry and might not dry completely in a normal dry cycle.

For best results, the water should be 120 degrees F as it enters the dishwasher – not lower or higher by much. If your water heater is located far from the dishwasher, it may be necessary to run the hot water at the faucet closest to the dishwasher to minimize the amount of cold water in the water line.