Troubleshooting for Icemaker Not Making Ice

When your refrigerator’s icemaker isn’t making ice, perform icemaker troubleshooting before calling repair. Chill out and try the following.

Icemaker Troubleshooting

1. Make sure the metal arm on your ice maker is DOWN and any control is set to “ON.”

Refrigerator Icemaker

2. Ensure the water supply is properly connected and turned on.

3. Tighten your drain cap. A loose drain cap leaves you with thin ice because water will empty from the water pan.

4. Examine the drain tube. The drain tube could be clogged from sediment. Flush out sediment by shutting off the water line, waiting and turning back on. Next, ensure there are no kinks in the drain that could prevent the flow of rejected water out.

Those are just basic tips everyone should try before calling for icemaker repair. Hopefully they works for you.

Featured image via KitchenAid

How To Change a Refrigerator Water Filter

Think of the children, won’t you? Replace your refrigerator’s water filter.

If your refrigerator dispenses water, chances are it uses a filter.

Most manufacturers recommend replacing the filter every six months to nine months, but certainly your fridge won’t blow up if you don’t. You might just drink some stanky water or notice a “decreased flow.” Or your ice maker won’t function as well.

Or you could just replace your filter when your status indicator light (or “change filter” light, as many customers call it) tells you to. Usually, this light lives on the temperature control panel. If you don’t have a change filter light, replace the filter based on the time frame recommendations outlined in the Use & Care manual you tucked away for safekeeping because you’re a responsible appliance owner.

Mostly, just use good sense, as the life of the filter depends on your usage and the quality of the water. If you notice a change in your water, replace your filter more frequently.

How To Replace Refrigerator Water Filter

For the filters like the one picture above left, rotate the cap counterclockwise until it’s vertical, and pull the cap and filter cartridge out through the base grille. Push the new filter cartridge into the base grille until it stops with the cap in the vertical position. Rotate the cartridge cap clockwise to a horizontal position.

For the filters like those on the above right, press the eject button and pull the cap straight out. Don’t twist the cap or it will detach from the filter. Push the new filter into the opening in the base grille. The button will pop out when the filter is in place, but give the cap a tug to make sure.

Maytag water filter

This kind of filter, found in the upper right corner inside the refrigerator, is pretty easy to replace. Just turn the filter counterclockwise until it come out, drain it into the sink and trash it. Next, remove the seal from the new filter, insert the filter into the filter head and turn it clockwise until it stops. Easy.

After Replacing Water Filter

Once you replace the filter, make sure you flush air from the water system, otherwise you’re going to have a drippy dispenser in your kitchen driving you absolutely nuts.

Hold a container to the water dispenser lever for 5 seconds, and then release it for 5 seconds. Repeat until water comes out. Continue holding and releasing the dispenser lever (5 seconds on, 5 seconds off) until a total of 4 gallons has been dispensed. You might get a little spurting as the air clears out, so beware.

Can’t get to the store for a new filter? You can still remove and use the water dispenser in bypass mode. You just won’t have filtered water.

What Refrigerator Noises Are Normal?

Image: maxabout.com

If you’ve replaced your refrigerator within the last several years, your shiny new model might be making its presence known in noisier way.

Why?

For one, foam insulation — often used to make these appliances more energy-efficient — lacks the sound-baffling capabilities of fiberglass insulation incorporated into previous energy hogs.

Here’s some other “normal” sounds to expect, along with their abnormal counterparts:

Evaporator coil

A boiling, surging or gurgling sound as the compressor starts and stops. Also, a pop as the evaporator expands and contracts after defrosting.

Evaporator fan

The sound of air being forced through the unit is normal, but a continuous ticking or even intermittent squealing is abnormal.

Defrost heater

Sizzling or hissing sound from water dropping onto the heater during defrost cycle

Compressor

Newer fridges’ compressors are much more efficient and run much faster, giving off a high-pitched hum, whine or pulse. But watch out for clicking during start up (especially if the lights dim), banging or knocking during start or stop, a ping or snap followed by the compressor stopping.

Cold control and defrost timer

A snapping or ticking sound as the refrigerator turns on and off

Plastic liner

Cracking or popping as the temperatures change

Drain pan

Running water during or after the defrost cycle

Water valve

Buzzing, clicking or running water as the icemaker fills or water is dispensed

Icemaker

Cracking of ice and cubes dropping into the bin

Condenser fan

Air being forced over the condenser is normal, but squealing from the motor is abnormal.

Condenser

You should hear a surging or gurgling sound from the flow of refrigerant when the compressor runs, but an improperly placed drain pan could cause rattling.

If the normal sounds bother you, consider a piece of rubber-backed carpet for underneath the fridge. You could even put sound absorbing materials inside the cabinet if the refrigerator sits in an enclosure.

Refrigerator Maintenance Boosts Longevity

Some people spend as much money on a kitchen as they do a car, yet expect to do no maintenance. Would you be surprised if your truck engine overheated if you never changed the oil or refilled the coolant? Most also expect to rotate and replace tires and wiper blades.

You might not have spent 13 grand-something on a fridge, but I’m sure you plunked down a good amount. Here are some maintenance tips to help get your return on that investment.

Moisten Fridge Gasket

refrigerator seal
Gasket, seal, “rubber thing” — whatever you call it, keep it moistened.

A small amount of condensation on the fridge or freezer is normal, especially during humid weather and summer vacation if you have kids who don’t know how to keep the refrigerator doors shut.

If you see more condensation than normal, check the seal (or gasket as we appliance nerds call it) for any obstructions and clear them. If there aren’t any, try moistening the gasket with Vaseline. Seriously, it works.

After applying a thin layer of Vaseline, organize your fridge. It doesn’t have anything to do with the seal, per se, but it will help you find what you need faster, meaning the door won’t be open as long. If Warners’ Stellian installed your fridge, we leveled it to tilt slightly back to encourage the doors to swing shut.

If someone else installed your fridge, consider leveling it in a similar way.

Clean Refrigerator Coils

New refrigerators have self-cleaning condensers. But if you have an old fridge, you might still have coils that need to be cleaned once or twice a year. Some fancy vacuum cleaners have attachments to suit this purpose. But otherwise, you’ll have to get a coil brush from an appliance parts store.

(If you find yourself driving to an appliance parts store to buy a coil brush, make a detour and buy a new fridge instead because yours is pretty darn old. The energy grid will thank you.)

To clean the coils, remove the base grille and use the brush or vacuum attachment to clean it, the open areas behind the grille, and the front surface area of the condenser.

If you have pets or hairy, shedding family members, take care that the area around the refrigerator stays clear to ensure proper heat exhaust. Otherwise, that thing will be running all the time.

Change the Water Filter

If you have a water dispenser, you likely have a water filter. Replace it every six months or take direction from your indicator light, if you have one. Or, if odor and odd taste don’t cramp your style, stretch the life of it. But seriously, beyond water quality, an old water filter can cause sediment to build up and cause problems.

There are probably seven different types of water filters. Yours is either is the top back corner of the interior, down in the kick plate, or along the top interior of the fridge. ALWAYS bring your filter into the store when you’re replacing it because we don’t necessarily know the type a filter goes with a model number we looked up in your order from two years ago. We can guess, but it’s still a guess.

After replacing the filter, flush the air from the water system to prevent dripping from the dispenser.

What did we miss? Share your refrigerator maintenance tips in the comments.

Ice Maker Not Working? Try This

Ice makers built into your refrigerator are super handy, but if something on a fridge requires troubleshooting, it’s usually our frosty freezer friend. The good news is you can probably diagnose and treat the most common problems without a service tech.

We’ve compiled some of our most frequently asked questions from about ice makers for you to print, save or bookmark (or frame).

Click on links below to jump to a section or scroll down and read the post in its entirety

How do ice makers work?

Troubleshooting

Still having problems?

How do ice makers work?

Water constantly runs over a freezing plate in your ice maker. Meanwhile, minerals from your water are rejected; this mineral water, if you will, is drained with each ice-making cycle.

When the ice is thick enough, it slides down into a cutter grid that separates the sheet into cubes, which fall into the storage bin. A sensor determines when the bin is full and the ice maker shuts off until more ice is needed.

Key takeaways: The bin isn’t refrigerated so some melting will occur, especially if you take your good, sweet time loading the freezer after a trip to the grocery store. Also, higher temperatures in the freezer mean fewer cubes. So shut that door! Likewise, if you want more ice, dial your freezer to a colder setting, wait for 24 hours and see what happens. Wash, rinse, repeat — ice cubes!

If your freezer is completely cooled, you should get a batch of cubes every three hours. Note: It takes 24 hours for a newly installed ice maker to start making ice and 72 hours for it to swing into full operation. So be patient and remember to be supportive of your new fridge as it reaches its full ice-making potential.

Troubleshooting

Ice makers vary from model to model, but here are the most common issues and how to make them go away.

Ice maker not/barely producing ice

Is the control set to “ON”? It should be.

Is the water supply properly connected and turned on? It should be, also.

A loose drain cap can leave you with thin ice because water will empty from the water pan, so tighten that drain cap!

The drain tube could be clogged from sediment. Shut off the water line, wait, and turn it back on. This should help flush the sediment out. And speaking of the drain tube, make sure there are no kinks in it as they could prevent the flow of that rejected water out.

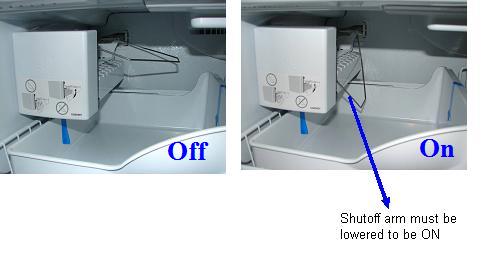
Make sure the metal arm on your ice maker is DOWN. (Remember: There’s no “on” in UP, but there’s “on” in dOwN.)

My ice cubes are small/hollow

You probably have low water pressure. You need a cold water supply with pressure between 35 and 120 psi to properly operate the ice maker. If you have a water dispenser, you can test the pressure by filling a measuring cup for 5 seconds. If you end up with fewer than 3 ounces (a little more than 1/4 cup), your pressure is likely low.

Do you have a water filter in your fridge? It could be clogged or installed improperly. Remove the filter and see if your water flow improves. If it does, try reinstalling the filter. If that doesn’t work, buy a new filter.

My ice dispenser isn’t working

Is your dispenser locked? It might sound stupid, but that’s probably why you didn’t check it before you checked this. Press and hold the lock button for several seconds to unlock.

Has there been a recent power outage? If power goes out for more than one hour, some models disable the dispenser. Press and hold the reset button to fix this. (Some models beep when they’re finished resetting.)

Check the ice chute for large clumps or cubes that are blocking it (continue below)

My ice cubes clump together

Pull any clumps out out of the dispenser and wipe the area out with a warm, wet cloth and then make sure to give it another once-over with a dry cloth. Ice clumps in the bin could also be your problem, so give the bin a good shake. If the clumps don’t separate, empty it and clean it out. This is also the solution is ice has formed around the auger (that usually-metal spiral thingy in the middle of the bin). Remember: It’ll take 24 hours to the bin to refill.

Ice clumps aren’t always because of melting. Even if freezer temperatures stay well below freezing, water molecules can condense and refreeze back together where the cubes are touching each other. So naturally, clumps can be lessened with more frequent use of the ice dispenser (i.e. don’t ignore it for a week).

Ice cubes can clump because of increased moisture due to a bad dispenser seal or gaps on in the freezer-door gasket (the rubber that seals to the freezer cabinet — try rubbing Vaseline on its face if it’s not sealing.) You’ll know bad seals are the culprit if there’s frost on the cubes. Unwrapped fresh food in the freezer can also be releasing the extra moisture.

Still having problems?

Call us at (651)222-001, option 4. We have a group of real, customer service representatives who answer the phones right here in our St. Paul headquarters/warehouse from 8:30-5:30 Monday through Friday.

Or you can contact the manufacturer directly, if you prefer.

Take some time to leave your own maintenance tips in the comments. What’s gone wrong? What works to fix it and what doesn’t?